We managed to get some tickets to see Greece vs. Columbia at the world cup, Belo Horizonte. A great atmosphere, great day (If you weren’t Greek).


We managed to get some tickets to see Greece vs. Columbia at the world cup, Belo Horizonte. A great atmosphere, great day (If you weren’t Greek).
A fantastic day with CEAMIG Belo Horizonte astronomy club. Great fun at their Wykrota observatory, helped along with a few beers and BBQ!
The picture of the spider below, I think is the Brazilian traveling spider. Poisonous as all heck, and has some rather odd effects on chaps!


NERD ALERT! NERD ALERT! ………… WEAR NERD HELMET NOW!!!
Last year, I helped develop a computer model of the atmosphere of extrasolar planets. The model was ‘1D’, meaning it was a single column through the atmosphere, immediately below the star. I’m currently extending that model to be 3D (like the weather models on Earth, simulating the whole globe). It’s tricky as these models can be very unstable, especially as this one uses a vertical height grid. Most Earth models use a more stable pressure grid – each vertical ‘level’ is a constant pressure instead of height. We need a height grid because the extrasolar planets we are studying are super-close to their star and have crazy (like “whoa!”) heating, so the pressure type models have assumptions which aren’t appropriate.
Anyhooooo ….. below is a simple little animation from my first simulation to run 10 days (a big hurdle). I’ve started by simulating Jupiter, which is a much calmer, less extreme environment that a close-in extrasolar planet. The animation shows temperature (colours), and winds (little arrows). The bright colours are the bits heated by the sun, moving as Jupiter rotates. The winds mostly blow eastwards (left to right), due to something called the Coriolis acceleration, which is caused by spinning (every 9 hours 56 minutes). We have the same type of thing on Earth, it’s what causes the jet stream and winds to blow in a circle around low or high pressure (eg hurricanes, which can seriously ruin a holiday).
NERD DANGER RECEDING!! …….YOU MAY NOW REMOVE NERD HELMETS!!! …. REPEAT, YOU MAY NOW REMOVE NERD HELMETS!!!
Over the last year, I took photos of my breakfasts.
I know, don’t say anything. I know.
Locations are New York, London, Israel, Jordan, Nepal, India, Australia, New Zealand, Fiji, New York and Brazil.
In portuguese, R at the start of a word is pronounced with a “H” sound.
Tonight I went to see some hockey hole (Rock and Roll) at Praça da Liberdade in Belo Horizonte.
Some good bands, good atmosphere, no hockey to be seen.


We’ve been in Brasil about a month now, and finally made a trip with some friends out of the city, to the Inhotim Art Museum.
Normally modern art can leave me cold, but this was great. Glad I took my beret now.


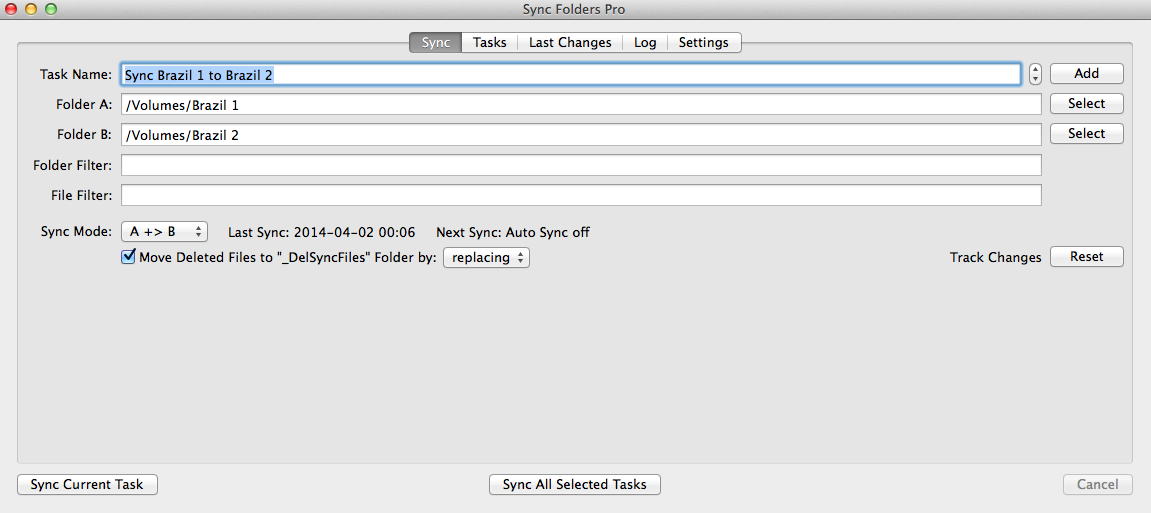
My wife and I recently got back from a 6 month backpacking trip around the world. During this time I was taking lots of photos, video and time-lapse with my Canon 6D and Sony RX 100 v2, which I processed on a Lightroom and Final Cut Pro X and a macbook air 2010. Since I was told before going that it would be impossible to do any processing with a Macbook air, I thought I’d write a few notes about the system I came up with. By the end of the trip I had over 100,000 photos and hundreds of video clips, and though sometimes my system was a bit sluggish and I had to be pragmatic in what I could process, I was able to basically process anywhere. Admittedly my setup below will become obsolete fairly quickly, but it might be useful for others thinking of backpacking with a laptop.
The basic setup was that I did everything off an external drive, which had the advantage of not filling up my meagre Macbook Air hard disk, and being able to keep the small external disk separate to my laptop. Also, I mirrored (copied) the drive to another identical drive, which I kept separately in case things got stolen. Periodically on the trip I would post home the copy.
For examples, see the rest of this blog! Particularly these photos and videos. I did some longer video, but I’m afraid they aren’t public so you’ll have to take my word for it!
Importing into Lightroom
Importing into Final Cut Pro X
Admittedly, I wasn’t working with hundreds of hours of film, but for fairly small projects it seemed to be fine.
Backup
Secondary Backup
Periodically I would also export my best photos from lightroom as JPEGS to Picasa (or rather private Google+ albums now). I used the Lightroom JF PicasaWeb plugin. This export meant that even if I lost all external disks, I’d at least have something. Finding internet on the road was actually quite easy.