My wife and I recently got back from a 6 month backpacking trip around the world. During this time I was taking lots of photos, video and time-lapse with my Canon 6D and Sony RX 100 v2, which I processed on a Lightroom and Final Cut Pro X and a macbook air 2010. Since I was told before going that it would be impossible to do any processing with a Macbook air, I thought I’d write a few notes about the system I came up with. By the end of the trip I had over 100,000 photos and hundreds of video clips, and though sometimes my system was a bit sluggish and I had to be pragmatic in what I could process, I was able to basically process anywhere. Admittedly my setup below will become obsolete fairly quickly, but it might be useful for others thinking of backpacking with a laptop.
The basic setup was that I did everything off an external drive, which had the advantage of not filling up my meagre Macbook Air hard disk, and being able to keep the small external disk separate to my laptop. Also, I mirrored (copied) the drive to another identical drive, which I kept separately in case things got stolen. Periodically on the trip I would post home the copy.
For examples, see the rest of this blog! Particularly these photos and videos. I did some longer video, but I’m afraid they aren’t public so you’ll have to take my word for it!
Equipment
- Macbook Air 2010 model
- Canon 6D Camera
- Sony RX 100 v2 Camera
- Multiple 1 TB external hard disks (Western Digital Ultra). These are getting really quite inexpensive now (~ $100)
Software
- Lightroom 5 (for video/photo library management and photo processing)
- Final Cut pro X (for video processing)
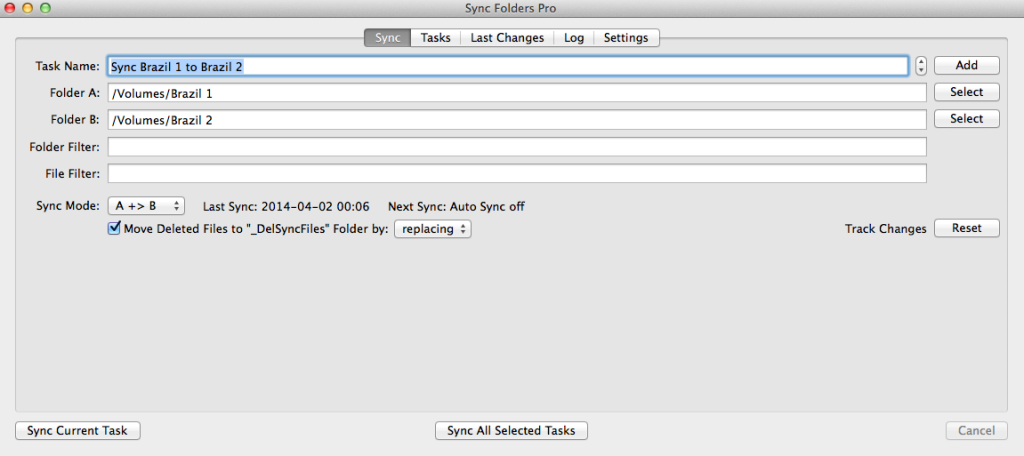
- Sync Folders Pro (for mirroring external disk to secondary, ie backup). It can be installed via the AppStore and only costs a few dollars
Preparation
- Install the software listed above before you go!
- So that Final Cut Pro X would recognize the external disk, I had to make sure they were formatted for Mac. I also encrypted and password protected the disks during this process in case they got lost/stolen. To do this, assuming you have anew blank external drive:
- Connect external drive
- Start Mac Disk Utility
- Select the drive and click on the Erase tab
- Select format Mac OS Extended (Journaled, Encrypted)
- Select Erase to start the format
- When promoted enter password
- The formatting will run. Next time you connect the disk, you’ll need to enter password. It can also be stored in your keychain so you don’t have to do it every time
- Create a subdirectory on the external device, called “Lightroom” or similar
- In Lightroom Select File >> New Catalogue and store it on your external disk, in the directory just created
Workflows
Importing into Lightroom
- Connect your external drive, navigate to where lightroom catalogue file is (the file ending in .lrcat), and click on it to launch lightroom
- Plug you SD card with films/videos directly into the Macbook Air SD slot.
- In Lightroom, click Import
- Click on SD card source
- Important! Be sure to make the Destination in the right-hand pane, the sub-directory on your external drive. If you don’t do this, it’s easy to fill up your Mac.
- If you do import directly to your laptop hard drive by accident, it’s easy to move the imported folder simply by dragging from laptop disk to external disk (see left hand folders pane). Note, if you already have a folder with the dated name, you might need to rename before dragging
- Once in Lightroom, you should be able to process as normal. For performance, you might consider creating multiple libraries, but for me having 100,000 photos was viable. For me processing typically was:
- Sharpening, cropping, color adjustments
- Processing time-lapse using the LRT Timelapse plugin – some of the steps were definitely slow, such as rendering
Importing into Final Cut Pro X
- I used Lightroom to manage all photos and videos, so first I imported there (see above)
- When I needed a subset of video clips to work with in FCPX, I selected them in Lightroom and exported as originals to my external disk. To keep things tidy, I created a FinalCut/Exports sub-directory on my external disk
- I then imported in FCPX from my external disk
Admittedly, I wasn’t working with hundreds of hours of film, but for fairly small projects it seemed to be fine.
Backup
- Plug in main external disk where media stored
- Plug in second external disk
- Run Sync Folders to ensure all data mirrored to second disk. The settings I used are provided in the screenshot below
- Keep second disk separate to main disk to reduce the chance of losing both through theft etc
Secondary Backup
Periodically I would also export my best photos from lightroom as JPEGS to Picasa (or rather private Google+ albums now). I used the Lightroom JF PicasaWeb plugin. This export meant that even if I lost all external disks, I’d at least have something. Finding internet on the road was actually quite easy.